Why a checklist matters (especially when buying from China)
A mini dumper looks simple: engine, pump, valve, chassis, and a bucket. But the failures that hurt the most are rarely “obvious on day one.” The expensive problems usually come from small shortcuts—thin steel in high-stress areas, rushed welds, cheap hoses, sloppy routing, weak bearings, poor cooling layout, or missing parts support.
For importers, distributors, and rental fleets, the real cost isn’t just repair. It’s:
- missed season sales,
- warranty returns,
- angry end customers,
- parts chaos,
- and reputation damage (especially if rebranding).
So the goal of this checklist is straightforward: catch the “invisible reliability” issues before the machine ships—not after it breaks on a job site.
Quick red flag scan: 5 minutes that saves months
Before getting into the full 25 points, do this ultra-fast scan first. If 2–3 of these are bad, the deal usually isn’t worth “hoping it’ll be fine.”
- Paint looks great but welds look messy (paint can hide grinding marks and spatter).
- Hydraulic hoses rub on sharp edges (future leaks are guaranteed).
- No serial number plate / mismatched engine model numbers (paperwork risk).
- Oil leaks already visible on a “new” unit (assembly quality risk).
- Supplier avoids real test videos (no cold start, no load test, no underside footage).
If this 5-minute scan feels wrong, the full checklist will confirm it.

The 25-point Chinese mini dumper inspection checklist
A) Identity, paperwork, and compliance (Points 1–5)
1) Serial number plate & machine identity
- Check for a clear, permanent serial plate (not a sticker that peels).
- Serial number should match the invoice, packing list, and test record (if provided).
- Bonus check: stamping location should look “factory standard,” not random.
Why it matters: if a unit has identity confusion, everything becomes harder: warranty tracking, parts matching, compliance questions, and resale.
2) Engine nameplate, model, and emission claim
- Photograph the engine nameplate close-up.
- Confirm the engine model matches what was promised.
- If the seller claims “EPA/Euro/CE compliant,” demand proof (not just a sentence on the PI).
What often goes wrong: “same power” engine swapped last minute to save cost.
3) Key documents (don’t accept screenshots only)
Ask for a clean PDF set:
- Commercial invoice + packing list
- User manual (English if exporting to EU/NA/AU)
- Parts manual or parts list (even a basic exploded view helps)
- Warranty terms (written, not chat messages)
Distributor tip: a parts list is not “nice to have.” It’s the foundation of after-sales.
4) Compliance and labeling (market dependent)
- For EU sales: check what the supplier provides around CE (and what components are actually certified).
- For North America: clarify what is required for your channel (engine emissions labeling is a common pain point).
Important reality: A mini dumper can be sold in many places without the same requirements, so buyers must align the paperwork with the target market.
5) Packaging and shipping protection
Inspect:
- steel frame or strong pallet base
- protected controls (levers/joystick not exposed)
- battery disconnected for sea freight
- rust prevention on exposed machined surfaces
Why it matters: a dumper can leave the factory perfect and arrive “mysteriously damaged” from loose packing.
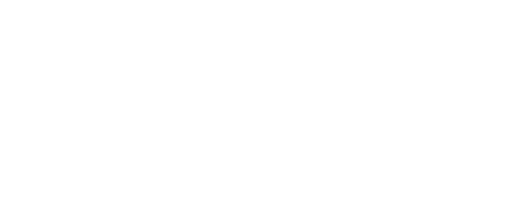
B) Structure, welds, and paint: the “hidden reliability” zone (Points 6–11)
6) Chassis steel thickness where it matters
Check high-stress zones:
- pivot points
- hinge brackets
- dump bed mounts
- track frame mounts (for tracked units)
How to inspect without lab tools: compare thickness at critical brackets versus non-critical covers. If everything is thin, that’s a signal.
7) Weld quality (look for these 6 signs)
Good welds usually have consistent bead width and smooth transitions. Red flags:
- undercut (groove along the weld edge)
- porosity (tiny holes)
- spatter everywhere (rushed process)
- incomplete fusion (weld sitting on top like “glue”)
- cracks at start/stop points
- heavy grinding that “hides” bad welds
Real-world result: bad welds don’t fail in the yard. They fail on slopes, bumps, and repeated dumping cycles.
8) Stress concentration checks (small details, big consequences)
Look for:
- sharp inside corners with no radius
- bracket edges not chamfered
- no gussets where the cylinder mount loads the frame
Simple rule: where load changes direction (lift, dump, brake), steel needs help.
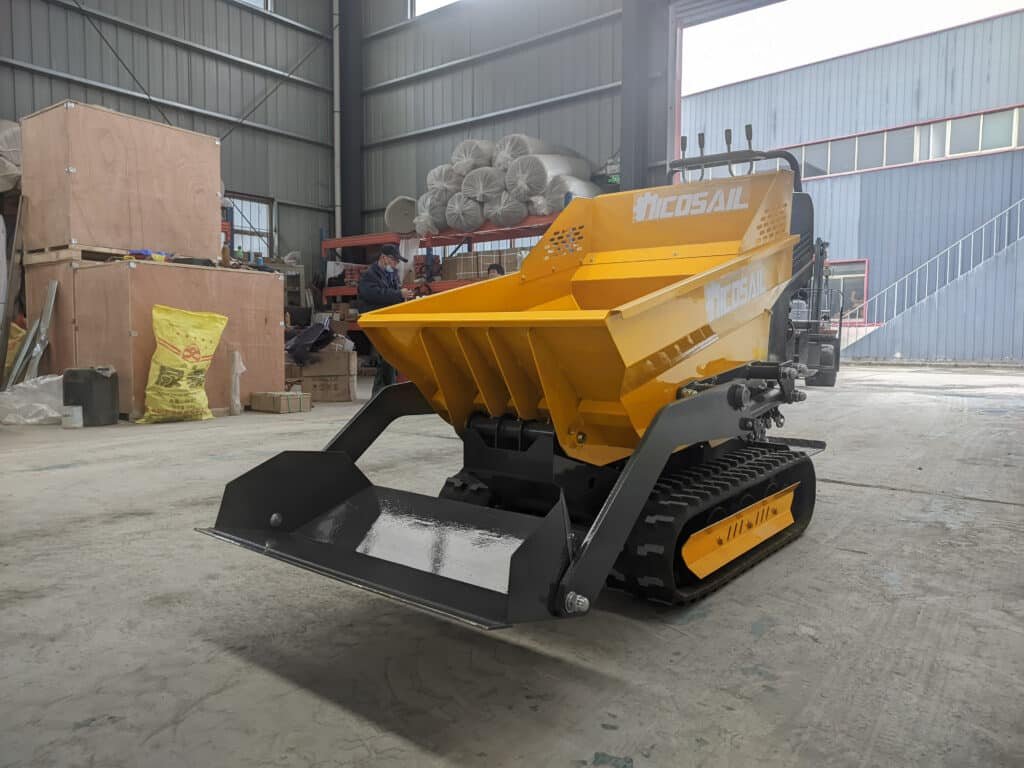
9) Dump bed alignment and hinge fit
- Dump bed should sit square with even gaps left/right.
- Hinge pins should not look “forced in” or misaligned.
- Check for sloppy play at the hinge.
Why it matters: misalignment creates cylinder side-load and early pin/bushing wear.
10) Paint and anti-rust prep (don’t be fooled by glossy paint)
Ask for:
- surface pretreatment process (at least degreasing + rust removal)
- primer type and thickness claim (even a simple statement is better than silence)
Inspection trick: look inside hidden corners under the bed and under the floor plate. If those areas already show flash rust or thin coverage, outdoor life will be short.
11) Fasteners: grade and consistency
- Mixed random bolts are a bad sign.
- Look for missing washers, mismatched nuts, poor torque feel.
Why it matters: assembly discipline predicts future reliability.
C) Powertrain: engine, cooling, drivetrain (Points 12–16)
12) Cold start video (non-negotiable)
Request a single-take video:
- hand touching the engine to show it’s cold (or show ambient + time)
- start without spray tricks
- idle stability for 60 seconds
What it reveals: compression health, fuel system quality, and tuning.
13) Engine mounting and vibration control
Inspect:
- engine mounts (rubber isolators present and seated)
- bolts properly torqued
- no metal-to-metal contact
Why it matters: vibration cracks exhaust, breaks brackets, and loosens fasteners.
14) Cooling layout and protection
Check:
- radiator size looks “not toy-like”
- fan shroud present (airflow control)
- radiator protected from mud/stone hits
- no hoses rubbing the frame
Common failure pattern: overheating in summer work because the radiator is too small or airflow is poorly guided.
15) Air filter and intake routing
- Filter should be accessible and properly sealed.
- Intake should avoid direct dust blast from the track/tires.
- Clamp quality matters more than people think.
Why it matters: dust kills engines quietly. A dumper lives in dust.
16) Transmission / final drive noise and feel
For hydrostatic/gear drive types:
- listen for whining, grinding, or clunks during forward/reverse
- check oil level and oil cleanliness (milky oil = water contamination)
Dealer tip: if the supplier refuses an underbody video showing the drive system and oil check, assume risk.
D) Hydraulics and controls (Points 17–20)
17) Pump, valve, and cylinder brand transparency
Ask directly:
- pump type (gear vs piston)
- rated pressure
- valve block model
- cylinder bore/rod specs (basic is enough)
A serious supplier can answer without “checking later.”
Friendly warning: “Same as others” is not a spec.
18) Hose routing and protection (the #1 leak predictor)
Inspect for:
- rubbing points
- tight bends
- hoses stretched at full dump
- no protective sleeves in abrasion areas
- poor clamp support (hoses flopping around)
Practical standard: hoses should never be the “strap” holding themselves in place.
19) Hydraulic fittings and leakage check
- Look for oil sweating around crimp ends.
- Check the valve block and cylinder ports for wetness.
- Confirm fittings are not mixed incorrectly (some shops mix thread types).
New machine should be dry. A “slightly wet” new hydraulic system is usually a warning.
20) Control feel and return-to-neutral behavior
- Levers/joystick should return smoothly to neutral.
- No sticking, no “creep” motion when hands off.
- Emergency stop (if equipped) should function cleanly.
Why it matters: control problems become safety problems fast.
E) Undercarriage: tracks/tires, rollers, brakes (Points 21–23)
21) Track/tyre condition and spec match
- For tracked dumpers: check track tension range and adjuster design.
- For wheeled dumpers: confirm tire brand/model and load rating (or at least consistent quality).
What often happens: tires/tracks get downgraded quietly to save cost.
22) Rollers, idlers, and alignment (tracked)
Inspect:
- roller seals not leaking
- track runs centered (not grinding one side)
- welds on track frame brackets are clean
Why it matters: undercarriage is a long-term cost item. Bad alignment eats tracks early.
23) Braking performance (don’t skip)
- Confirm parking brake holds on a slope.
- Check service brake response (if equipped).
- No unusual squeal or grinding.
Rental reality: brakes get abused. Starting with weak brakes is asking for returns.
F) Electrical & safety (Point 24)
24) Wiring, switches, and safety basics
Inspect:
- wiring harness has protection (loom, grommets)
- battery is properly mounted and clamped
- key switch, lights (if any), horn (if any) function
- safety decals and basic guarding are present
Small detail that matters: loose wiring near vibration zones becomes intermittent faults that are hard to diagnose.
G) Test run / load test (Point 25)
25) Do a real load test (not “empty dumping”)
A proper test includes:
- drive forward/reverse under load
- dump a real load (gravel/soil) multiple cycles
- check hydraulic temperature feel and engine response
- listen for pump cavitation or strain noises
- confirm no excessive smoke under load
Why it matters: empty tests hide weak hydraulics, weak cooling, and poor drivetrain tuning.
How to run this inspection in 60–90 minutes (step-by-step)
Here’s a simple flow that works well for a factory visit, third-party inspection, or video-based remote inspection.
- Identity + nameplates (5 min)
Serial plate + engine plate photos. - 360° walkaround + underside video (10–15 min)
Slow, close, steady camera. Focus on welds, hose routing, undercarriage. - Cold start (5 min)
One-take video: cold start + idle. - Hydraulics check (10 min)
Full dump up/down cycles, watch hoses at full stroke. - Drive test (10–15 min)
Forward/reverse, turning, slope if possible. - Load test (10–20 min)
Real payload, repeat dumping. - Leak check after warm-up (5–10 min)
Park, look again for oil sweating. - Paperwork review (10 min)
Confirm document package matches what was promised.
What to demand from the supplier before paying the balance
This part is where many buyers lose leverage. The easiest way is to ask for a simple “delivery pack” (standard for serious exporters):
- Final QC checklist with serial number
- Cold start + load test videos (show the serial plate in the video)
- Packing photos (before closing the crate)
- Spare parts recommendation list (fast-moving consumables)
- Written lead time for parts shipment
- Warranty claim process (what evidence is needed, how long response takes)
A brand that’s building long-term export business will have a system for this. For example, some established manufacturers like Nicosail typically support buyers with clearer inspection records, parts matching, and more consistent build documentation—useful for distributors who need fewer surprises—but the checklist above still applies to any supplier, big or small.
FAQ
1) What’s the most common mini dumper failure after import?
Hydraulic leaks and hose failures are near the top, usually caused by bad routing, rubbing, cheap hose quality, or weak crimping—things that are easy to catch before shipping.
2) Is a “CE mark” enough for EU customers?
A CE mark on a sticker is not a guarantee by itself. Buyers should ask what documents are provided, what standards are referenced, and whether key components match the declared configuration. If paperwork is vague, treat it as a risk and verify carefully.
3) What should be included in a spare parts starter kit?
Typical fast-moving items:
- filters (air, fuel, oil, hydraulic if applicable)
- belts (if used)
- common hoses and fittings
- a seal kit for key cylinders (if the supplier offers it)
- switches/fuses, small electrical items
This prevents downtime while learning the machine.
4) How can a buyer inspect remotely if travel isn’t possible?
Ask for:
- one-take videos (cold start + load test)
- slow underside video
- close-up photos of welds, hose routing, nameplates
Then hire a third-party inspector to run the same checklist on-site.
5) What’s the fastest way to spot a “looks good in photos” dumper with poor build quality?
Check weld quality, hose routing, and underbed/underside paint prep. Those areas reveal real manufacturing discipline.
6) Tracked or wheeled mini dumper—what’s safer for slopes?
Tracked models generally have better stability and traction on soft ground, but safety also depends on center of gravity, load height, and operator habits. A real slope test and braking check are essential either way.
7) What should a distributor ask for to support rebranding?
- consistent serial number system
- stable parts compatibility (avoid “silent substitutions”)
- a parts manual/exploded view
- packaging standards
- stable lead time and written warranty process
Summary
A Chinese mini dumper can be a solid, profitable product—if it’s inspected the right way. The smart approach is not “does it look new,” but does it show disciplined manufacturing in the hidden areas: welds, stress points, hose routing, cooling layout, undercarriage alignment, and paperwork consistency.
Use the 25 checks above as a repeatable process. It protects distributors from warranty chaos, helps rental fleets avoid downtime, and gives end users a machine that starts, dumps, and drives reliably through the season. And when comparing suppliers (including experienced exporters like Nicosail), the same rule applies: the best partner is the one that can prove build consistency with transparent tests, documentation, and parts support—before the container leaves port.